
Can You Wear A Camera on Your Helmet? Helmet cameras are becoming more and more popular as every part of our lives becomes recorded. They’re a great way to record footage of accidents and gather evidence in case you need it. Without the necessary evidence, anyone can be charged. Installing a helmet camera keeps you safer and ensures you won’t be caught up in a false lawsuit.
But do you know how to install a camera on a motorcycle helmet? Here’s a step-by-step guide on mounting your first helmet camera.
Different Mounting Locations:
Flat Vs. Curved Surface Installs:
Mounting a camera on a flat surface is not the same as mounting it on your helmet. Your helmet is curved, which means you’ll most likely need a curved camera mount. You can find these for cheap and in bulk.
However, if your target surface is somewhat flat, such as the helmet’s sides, you’ll need a flat-mount.
Top-Mount:
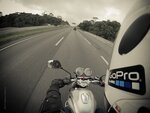
The top of the helmet is the most common place to mount your camera. This way, the camera looks straight ahead, and your helmet does not obscure your footage. For the top, you’ll most likely need a curved surface mount.
But if the camera is angled so that your field of view becomes obscured, you may not want a top mount. Instead, try going for a side or chin mount.
Side Mount:
Mounting your helmet camera on the sides is not very common, but it’s still an option for people who don’t want a top mount. This would be if you have a full-face helmet, and a top mount would interfere when you open the visor.
Chin Mount:
The Chin mounting is starting to gain popularity among motorbikes, and for all the right reasons. Chin mounts give you a better perspective as they can show you what’s happening in your line of sight.
A top mount has a lot of extra space at the top of the field of view, whereas the chin mount has a better POV. Chin mounts also make your helmet a lot more aerodynamic.
What Is the Best Location?
Now you know how to choose a motorcycle camera location. But what’s the best choice? The best mounting location depends on your preference. If you have a full-face helmet, you might want to consider a chin or side mount. Otherwise, you should go for a top mount.
What Accessories Do You Need to Mount A Motorcycle Camera?
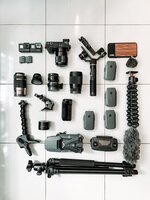
Flat or Curved Surface GoPro Mount:
This is where you will mount your camera. Nothing much to it.
Quick Release Buckle:
The Quick Release Buckle is what will hold your camera and allow it to rotate about the mount if needed.
White Rubber Anti-Vibration Locking Plug:
Once you’ve set the camera’s angle, use this to lock the quick release buckle in place.
Isopropyl Alcohol:
Isopropyl alcohol will be used if your mount uses 3M VHB tape. It’s used to prepare the surface. Wipe down the helmet with a 50% isopropyl alcohol solution. You may need something else for preparation if the mount doesn’t use 3M VHB tape.
Measuring Tape and Pencil (Or Any Other Marking Tool):
Wherever you choose to mount your camera, you want it to be centered. A tape and marking tool (preferably a pencil) will be sufficient for this.
A Clamping Tool:
Finally, you’ll need a clamping tool to hold down the mount while the adhesive is curing. It takes some time, and you want the maximum security possible. So, don’t be lazy in this step.
Fine-Tuning the Settings on Your Motorcycle Camera:
It often helps to fine-tune your camera settings to get a better view of what’s happening. Here’s how to choose a motorcycle camera with the right settings:
Resolution:
You want to choose the highest resolution available on your camera, which can range from 720p to 4K. However, keep in mind that more resolution means less battery life.
Frame Rate:
If recording at average speed, fine-tune the frame rate to be 24 FPS (frames per second). If you want to shoot in slow-motion, go above and beyond with 60 FPS or even 120 FPS.
White Balance:
This refers to how true the whites in your camera appear. You can change up the white balance if you want a special “filter” effect. If not, you should set it to “Auto.”
Field of View (FOV):
It’s recommended to have a wider FOV. Keep in mind that, as the FOV gets wider, the resolution may go down. So, zooming in may not be possible.
Shutter Speed:
Shutter speed is what will help reduce motion blur. The higher the shutter speed, the clearer picture the camera will take. You want to keep it at 1/48 for a 24 FPS camera.
How to install a camera on a motorcycle helmet – Step-By-Step:
Now the big question has arrived. How do you install a camera on your motorcycle’s helmet? Here are some step-by-step instructions:
Decide A Location:
Decide where you want to place the camera? Is it on the top of your helmet, at the side, or down at the chin?
Mark the Center Point:
Then, mark the center point of where you want to mount. Find two equidistant points (such as the vents on the helmet) and use your tape and pencil to mark the center point.
Find two similar equidistant points and mark their center point. Now join the two center points using your pencil. This will be your centerline. You should mount your mount along this line.
You might want to extend the line since some of it will get wiped by the preparing materials.
Prepare the Surface:
Depending on the type of mount, you may need to prepare the surface. If your mount uses 3M VHB adhesive tape, you’ll need to prepare the surface with 50% isopropyl alcohol. Also, remove any visible dirt.
Adhere the Mount:
After prepping, stick the mount onto the surface however you find suitable. Or follow the manufacturer’s instructions.
Install the Camera and The Buckle:
Next, you’ll need to install the buckle, which will usually be screwed onto the mount. And now it’s finally time for the camera. Your GoPro should already be compatible with the buckle. But if not, you may need an adaptor.
Lock It in Place:
Now you must adjust the camera angle so it’s pointing where you want it to. Use the anti-vibration lock plug to lock it into place.
FAQ
Is It Illegal To Have A Camera On Your Motorcycle Helmet? (this is not legal advice!)
The laws are quite vague regarding this. In 49 C.F.R Sec. 571.218, the Department of Transpiration mentions that any helmet with projections or permanent modifications is prohibited. Many argue that these projections refer to projections on the original design of the helmet. They’re not referring to any modifications you may make.
Still, it’s a good idea to mount your camera elsewhere if you’re afraid of getting pulled over. You can try one of those clip-on cameras that will clamp onto your jacket or collar.
What States Allow to Mount the Camera on The Helmet?
Again, it’s a bit vague. Most states allow it, but some cops may make de-facto charges depending on what they’ve been instructed on. Talk to a few bikers and see if the area around you is strict regarding this.
Additionally, it’s always illegal to film something you shouldn’t, whether through your helmet camera or phone.
Why Do Motorcyclists Wear Cameras?
Cameras serve a very important legal purpose: they capture video evidence. Motorcyclists are the most prone to getting into a fatal accident. As such, a helmet camera is crucial for gathering evidence and avoiding irrelevant charges.
How Do You Record A Video While Riding A Motorbike?
Most cameras have a recording function that you will have to turn on before each ride manually. Some may feature apps that let you or someone else remotely view the video in real-time.
Are helmet cameras dangerous?
There have been some concerns regarding helmet cameras and their safety. Some suggest that a helmet camera may interfere with how the helmet works and may cause spine and brain damage. Additionally, some believe that your neck will get snapped.
The case of Michael Schumacher is often cited, who suffered extensive injuries to the head and neck. But there’s still speculation regarding this. If you fear that cameras are dangerous, you could mount one on the chin.
Conclusion:
Motorcycle helmet cameras look quite simple, but they’re quite complicated. Now that you know how to install a camera on a motorcycle helmet and fine-tune it, it’s time to buy your own.
Just be wary of any cops who might want to rile you up. Research into the local laws and how the cops treat other bikers and plan your journey ahead of time. It’s better to find out if you’re even allowed a helmet camera before buying one.
Now, what are you waiting for? Go out and buy your very first helmet camera!