
Are you dealing with motorcycle charging problems? Can you repair a motorcycle stator? These are the questions that come up when your bike is not getting the right charge that it used to.
And the good thing is that with just a little bit of do-it-yourself experience, you can handle this project on your own. No need to pay a visit to your bike technician.
A faulty generator is the most apparent cause of the issue that your bike is not charging properly. Maybe your stator is not generating enough charge or any charge at all.
This guide will explain how you can deal with this issue on your own and resolve your charging issues for good so keep reading.
What is a Motorcycle Stator?

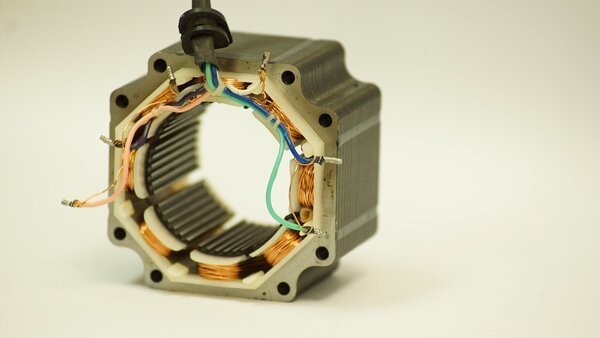
So, what is this stator thing and can you repair a motorcycle stator? Those of you who don’t know what a motorcycle stator is are a fixed part of your bike. A stator is located right around the alternator, a type of magnetic flywheel and generates alternating current.
This current is then passed down to your bike’s rectifier or regulator and is converted into direct current and keeps the voltage within certain limits. This is to ensure your bike’s battery doesn’t get damaged due to overload.
Faulty stators can be a pretty frequent occurring problem, especially if your bike has a bigger engine. Unfortunately, motorbikes with more significant engines generate many alternative currents to fry the stator, in which case it needs to be repaired or replaced altogether.
Can You Repair A Motorcycle Stator or Go for a Replacement?
The most important decision to make here is whether to go for a repair or a replacement? It’s not about whether or not “can you repair a motorcycle stator”. It is a better option for you to go for a replacement for most modern and popular motorcycles due to the easy availability and cheaper cost. Going for an aftermarket stator is always a better option.
These aftermarket stators are almost one-third of the OEM stators cost, and they also come with an excellent warranty in most cases. Of course, you can repair it, but replacement is always a cheaper option, mainly if your bike is a modern model.
Repairs are labor-intensive, and they need meticulous cleaning and unwinding of the original stator part and preparing for the new wirings and installation. Furthermore, you will have to rewind the new core carefully, and for that, you need to have a specialized machine.
You can do it with your hand, too, if you want, but the wire’s quality should be top-notch. However, you will have to repair if you have uncommon or old models that don’t have new or fresh aftermarket parts available. So, can you repair a motorcycle stator? Yes, but should you do it is the primary concern here.
Symptoms of a Motorcycle Stator Gone Bad – Can You Repair A Motorcycle Stator
How do you find out that your motorcycle stator has gone bad? To understand this, you need to understand what is the purpose of a stator. And as we have mentioned above, this stator is responsible for the functioning electrical system on your bike.
Electrical systems on bikes are not much understood because people are not very fond of working on wiring and electricity. But even if you don’t want to work around the wirings, you should know the symptoms that you need to determine if it’s your stator or something else.
● Weak or no spark
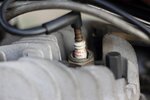
Without a properly working stator, your bike is not going to get any spark at all. It will make the battery weak, and producing a spark is not possible. So, your bike won’t start at all, or it will run poorly.
This might result in a dead battery because there is no way to charge it. Diagnosing the stator issue can be quite difficult because many other components might be causing the spark not to generate.
But you will notice that your engine is not working like it used to be. And you will find it out as soon as you start your bike. There might be a very weak spark, or there might be no spark at all.
Dead battery
With low or no spark at all, your bike will lose its battery charge for a go, and it’s only going to be a matter of time. After that, your bike won’t start, and you will feel the bike not taking any current at all.
Engine behavior changes
You will also notice that your stator behaves differently when it is hot as it is supposed to when it is cold. And this is when you can find out the issue of the stator with surety.
Engine misfires
There might also be a case of misfiring and a lot of it when you are riding around. Unfortunately, these misfiring can worsen, and you might end up with a bike that doesn’t start at all.
Cause of Stator Failure
What can cause a stator to fail on your bike? In most cases, you might not think that your stator is faulty because you are too busy sorting out the issues with other components. For example, you might first feel that your bike is running well at lower RPMs, but it begins to go rough when you up the ante.
This is primarily due to that faltering high-speed coil, or the opposite can happen with the low-speed coil as well. These are some signs that your stator is going to go bad very soon. Your bike will also start to backfire a bit too much, which is due to a bad stator. Over time your stator begins to fail with the regular wear and tear.
Your stator might fail even if you put too much load on it by running multiple accessories at a time. Your stereo, GPS, heated grips, headlamps, and various other accessories are going to ruin the stator a lot quicker than it should. The stator will work harder to keep up with the requirements of all the accessories, and it just goes out one day.
Can You Repair a Motorcycle Stator – Step-by-Step

Have you decided to go for a repair or a replacement? If you are still reading this far, then we assume you have gone for the option of repairing. Unfortunately, it means you own an old or a unique model, or maybe the aftermarket stator was too expensive. In either case, you will have to be very careful with this replacement process.
Replacing the stator itself is not that difficult at all. You will only need a socket set along with a heat-resistant gasket silicone. Following are the steps that you need to carry out to fix your motorcycle stator.
Equipment needed
- Heat resistant gasket silicone.
- Socket set.
- File or a mini drill.
- Insulating paint.
- Copper wire (0.95mm).
- Multimeter.
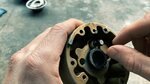
Step 1 – Taking it out
You have to make sure that the engine is cold before you touch anything to avoid any burns. Now, remove those plastic fairings if there are any and locate that gasket cover. Next, you have to unplug the electrical connection and test all three connections using a multimeter. This is to ensure that the stator is faulty and useless.
Now place a tray right below this section of your bike to avoid any engine oil spillage on the floor. Next is to remove those bolts from your gasket cover with the help of a socket wrench and take the gasket cover out. Also, remove those bolts that are holding the stator in place.
Step 2 – Uncoiling the old stator
This will be a slightly tedious job because the epoxy to keep the stator in place is pretty much hard to remove. You will need a screwdriver here to lift those wires inside and right between those poles.
You will have to be very careful as you are dealing with copper wires. Moreover, you will have to unwind the wire while looking out for and insulating paint bits that are still there. These bits are quite sharp, and they might cause an injury to your hand or fingers.
Step 3 – Preparation of support
Just don’t start recoiling the stator straightaway. You will have to prepare its surface first. For this, you will have to smooth out the surface and any sharp edges on it using a file or even a mini drill. Don’t try to use a paint remover gel on this surface to get rid of those epoxy residuals because that is of no use at all.
For the wire, you will have to prepare three dozen (36) small pieces of cardboard mylar that need to be cut in the right size. Now, take these pieces and cover all the poles on your stator. The mylar cardboard that we are talking about here is the same that is used for transformer winding.
Step 4 – Coiling it up

You need to get some AWG-enameled copper wire that needs to be 0.95mm in diameter. You can go for the one that is available in electric motors or can buy one from a rewinding shop. Also, buy some insulation paint because you will need it at a later stage.
When winding your stator, you need to keep in mind that you have to hook your multimeter right to that metal body and the fixed end of the phase you are trying to wind if there are shorts between the wire on those sharp edges and the metal body.
Your multimeter will start to buzz if it is set on continuity or diodes. In such a scenario, you will have to unwind fast and take necessary measures, such as moving your coil to another position.
Step 5 – Finishing the job
Once you are done with all the poles, you have completed most of your job. After this, you will have to submerge your stator directly into the insulating paint and place it in the oven at around 300 Fahrenheit for about half an hour.
And then, you need to place it again in the oven at the same temperature and fire at the same time to make sure that a thick layer is formed on the stator. When you are done with this part, and the paint has cooled down, you will only have to solder those connecting wires back.
Step 6 – Cleaning the surrounding parts
When you have placed your insulating paint-coated stator into the oven, you don’t need to waste time standing around doing nothing. At this time, you need to get to cleaning the surrounding areas of the stator. Next, you will have to clean the cover and get rid of any oil and sealant residue. Then, finally, the entire assembly needs to be clean before you finalize everything.
Apply some gasket sealant right around that electrical wire output. Now fix that wire back into its palace using a bolt and check to see if all the internal pins are in the correct places. Apply some gasket sealant there on the body and the cover and allow it to dry.
Now take your cooled down stator, fix it back in place, and check everything before putting the cover back on. After ensuring that everything is in its place, you can gently cover and secure it with bolts. Make sure not to overtighten it, or they might snap. Remove any dried or excess sealant if you have applied it a bit too much.
If there is too much engine oil lost during this process, then replace that as well. Next, it’s time to start the engine and check for any oil leaks. You can test the electrical output at this time.
A useful tip
You will have to be extremely careful when you are removing the gasket cover in particular. This is because it can hold on to nothing, and the gasket cover and the magnetic flywheel hold the cover in their place.
You should try to tap around the cover gently to break the seal. The cover needs to slide off on one side, and there are pins inside and holding it in its place, and they are pretty delicate. It would be better for you to wedge a small piece of wood or plastic right into the gap when the cover starts coming off.
Don’t go for a metal piece for wedging because it might damage the cover or the body. The gap will close immediately as the cover slides off due to the strong magnetic pull; it will hold the cover back when you are done.
FAQ
Can I rebuild a stator?
Yes, you can rebuild a stator on your own. But it would be better for you to go for a replacement because it will require less time, money, and effort from you. If you have an older model bike, you can think about rebuilding a stator using a new wire.
How much does a stator fix cost?
This repair will not cost you much, but the exact numbers will vary based on your model and make. Older and unique bikes have scarce availability of components and parts, so they will cost more.
What are some common signs of a bad stator?
The most common signs that your stator has gone bad is no/weak spark or even misfiring. However, poor running and hard starts are also clues that you need to work on your stator.
Conclusion
So, what have you learned from all of this? The main thing is that identifying a bad stator is pretty difficult, and you have to be very specific about it. Why? Because replacing (although, can be done) is not that easy, and you will have to be very careful in your approach.
So, the matter is not about “can you repair a motorcycle stator” it’s about identifying the issue itself because so many causes might direct you in a different path
The most common signs are that your engine will begin to misfire, and you might have to deal with low-no spark. Your bike will also start to underperform at high RPMs. But again, there might be other faulty components causing these issues as well.
The point is that you will have to be very careful about this whole fixing thing, and it’s better to examine all the parts in detail to assess the issue with accuracy.
