
No matter how new your bike is, you never know what you might run into when you are on the road. You need to know what are some of the most common roadside repairs for motorcycles to handle them well and even prevent some mishaps beforehand.
If you know how to deal with these issues, you will be back on the road in no time. You won’t have to deal with the feeling of being stranded.
We will explore them one by one and see how you can tackle them.
What are Some of the Most Common Roadside Repairs for Motorcycles Everyone Should Know?
Loose chain
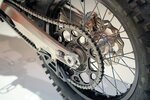
A loose chain won’t be an issue to deal with if your bike comes with a shaft or belt drive. However, if the drive system goes down, the problem can become very serious. But chains do tend to stretch over time, and you have to lubricate them properly.
So, how to identify loose chain problems? First, you will notice that rattling squeaky noise coming from your bike’s rear end while riding. In such a scenario, you will have a dry chain that you need to lubricate.
What to do when the chain has to be adjusted? Whether you are looking to change your chain or lubricate it, it would be better to do both of these together. Any adjustments or repairs will be easier if your bike is on its stand.
But if your bike doesn’t feature a center stand or even a snap jack, you can still do it with your back wheel on the ground. A quality chain slack needs to be 1-inch to 1.5-inch. But make sure you consult your bike’s owner’s manual first.
What will you do?
- First, you need to clean the chain and get most of the dirt or grime off. You won’t detail your work much at the roadside but try to get rid of it using chain cleaner and a piece of cloth. A toothbrush can come in handy in this situation.
- Now you can loosen your axle on the rear end using a hex bit and unscrew it a couple of turns. This doesn’t need to be extremely loose. But you might ask, what about that cotter pin? Some bikes have a cotter pin right through the bolt. And you have to replace it with a new one. If there is no replacement available, don’t lose or break the one you have.
- Most bikes will come with an adjustment nut at the wing arm on the rear end, while others might have a couple. You will have to loosen that outer nut if there are two nuts. After that, you can turn the inner one clockwise but keep the turns one half at a time. You will notice your chain is getting tighter. Repeat this adjustment on the other side.
- You can check the turn slack, repeat this adjustment half-turn, and turn the adjustment bolts into equal amounts.
- As you see the chain in its correct tension, you can tighten the bolts on the back axle and replace the cotter pin if possible.
- In the end, you need to lube your chain.
Hose broken or cracked
A broken or cracked hose can negatively impact your bike in various ways based on which hose is broken or cracked. So, what are the common places where hoses may get cracked or broken? Well, the most common is the connection point. You will only have to trim the cracked part of the hose off and fit it back to clamp it down. Of course, you can always carry extra clamps if they break.
If there is a crack in the fuel line or broken, use the silicone self-fusing tape and wrap it around the crack. This tap can stick on its own and has no adhesives. Therefore, it will not lose its ability to adhere.
When you apply this tape, make sure you stretch it tight and wrap it well to a good seal. A repair can consistently be reinforced with the help of a few zip ties just around the tap to prevent any unwinding. But a tapped hose is just a temporary repair, and you will have to get it fixed when your journey is finished.
Broke clutch cable

How to deal with a broken clutch cable? A sudden broken cable of your clutch can leave you right in the middle of nowhere. It’s better to replace the clutch right away instead of limping your way to the nearest repair shop.
You will require a clutch cable for this repair, and it needs to be specific to your bike. However, you will only need one tool for this, and that is a 10 or 12mm open wrench.
So, where to locate this broken clutch cable? This is the trickiest part of this repair, and you might have to remove your side panel to see where the cable goes.
What will you do?
- Right at your clutch lever, you have to loosen the perch adjuster and make it move to the cable. This will loosen the cable, and you will be able to remove it from the lever.
- From there, take a new cable and lube it from one end till you see some of the lube dripping out at the other end.
- Now string the new cable right on the old path as you pull the old one out.
- Now attach it to your clutch lever, secure it to the adjuster and leave it loose.
- After that, attach the other end of this cable to the engine below and tighten those adjustment nuts to eliminate the majority of the free play.
- Check the recommended amount of free play in your owner’s manual. However, if you don’t get this adjustment 100% accurate, don’t worry; an estimation can work equally fine.
- You can use zip ties to keep the cable in place; you can turn your handlebars all the way to see if there are any interferences or not.
Shifter lever broken
What if you have broken your shifter level? The shifter lever is there on your bike in a very vulnerable location. You might end up breaking it if you tip your bike over, drop it, or crash it from the left side. However, there are times when you can get yourself up and running on your bike with a good amount of tape to fit the level back in temporarily.
But such a kind of repair will make you even more frustrated. If your bike is fairly old and hasn’t gone through enough maintenance, breaking your shifter lever will become a big problem. Therefore, you need to repair it quickly at the roadside.
Most people tend to forget about it; therefore, we have mentioned it down in our list of what are some of the most common roadside repairs for motorcycles.
This roadside repair is not that difficult. You will only need to have the right kind of tools at your disposal and, of course, a replacement level. So, what are the tools that you might need to fix your broken shifter lever? Well, the type of tools depends upon the bike type you have.
But mostly, it will include a couple of small open wrenches and hex wrenches. Of course, you can always use an adjustable hex wrench as well. The good thing is you won’t have to remove any side panels for accessing the lever or any of its attachment bolts.
Some bikes do come with a rocker arm that you need to check for any signs of damage or cracks. If there is a bend there, your shifter will work just fine, and you can fix the bend later on. Some bikes might have their shifter liver end connected with the footpeg bracket, and you will have to replace this bracket to remove the lever.
Burnt tail or headlamp

This is probably the most common of all the issues, and you might think that it’s much easier to fix as well. However, it’s just as you are replacing the light in your household, so you are pretty much thinning straight. So, who can fix a burnt headlamp or a tail lamp?
First, you need to find out what type of lamp bulbs your bike comes with. Most of the naked bikes and cruisers come with H7 or H4 bulbs in their headlamps, and you can find these bulbs at any auto parts store. You need to have these bulbs in your repair kit.
The bulbs that are there in the indicators and tail lamps are much smaller. But, again, you can consult your owner’s manual to see which type of bulbs are there on your bike.
What will you do?
Replacing a bulb in your headlamp on a roadster is fairly simple. The lamps are exposed and are round in shape. As a result, they are much easier to handle, but the exact procedure varies for each bike.
- You need to begin by removing the lamp lens with the help of a wench that is suitable for your bike.
- You can remove the connector from the back, and it will free the lamp up. Here, you will be able to work on it in a much easier fashion.
- Remove that rubber cover at the back of the lens. It will protect the inside of the lamp from dust and debris.
- Remove that secure spring and fire that you will have to loosen one of those smaller screws but don’t remove them entirely.
- Take the bulb out and check if it’s broken or blown. In that case, your bulb will be brown, and its filament will be broken. If this is okay, you might have a problem with your fuse.
- Replace it with a new one and line up those spacers using the notches and plug in the connector. Now fit back in everything that you removed.
FAQ
How can I fix my flat tire?
Flat tires are right up there when it comes to highlighting what some of the most common roadside repairs for motorcycles are. First, you need to identify what type of bike tire you have. Next, you will have to carry some patches to fix the tube of your tires, and you also need a pump to inflate your tire. Finally, if it’s tubeless, you will need to fix the patch directly.
In either case, you will need to carry some fixes and an extra tube if you have a tubed tire. Make sure you understand how to remove the tire from the bike, and if it has a tube, you should know how to replace the tube. Again, it would be better for you to consult your owner’s annual to get through the process.
What type of maintenance does my bike need?
You have to do the regular oil checks and any coolant and fluid checks as well. This is a must before you begin riding. Also, check if your tires are properly inflated, brakes, and lights are working properly.
What is included in a major motorcycle service?
The major service of your motorcycle includes air filter changes, flushing those brake lines, fuel filters, greasing drive splines, changing engine oil, fork fluid are all considered major motorcycle services.
Is maintaining motorcycles easy?
Maintaining motorcycles is a lot easier than cars, regardless of the mechanical work involved. This is because bikes are much smaller, and they also don’t need much maintenance. But if you ride your bike a lot, you need to take care of it and understand how your 2-wheeler works.
Conclusion
Talking about some of the most common roadside repairs for motorcycles, the repairs will be a lot if your bike is older. Your older bike may go through any repair or maintenance. So, when you are riding the road, you need to be prepared for any situation.
But if you do regular maintenance, the chances of getting involved in any repairs will decline significantly. So, make sure you show your bike some love and care. And it will continue to work for many years to come.