
What’s worse than sitting on a rock-solid seat for hours on end? Nothing, to be honest. Uncomfortable motorcycle seats can hurt your back after a bumpy and long ride.
Quick answer: How To Make A Motorcycle Seat. Start with the simplest checks first (setup, wear items, obvious damage), then only move to deeper diagnostics if the basics are confirmed.
If your issue affects brakes, steering, tires, or there’s any fluid leak, stop riding until it’s inspected.
If you find that your seat is getting uncomfortable, you can try toughening it for support or softening it for comfort.
Many people resort to adding a wad of memory foam to the seat because it feels so good in their mattresses. But your seat is not your mattress, and sure enough, memory foam will only make it worse.
So, what canyou use? And how do you rebuild the whole seat? If you want to know how to make a motorbike seat, then read on.
What Is the Best Material for Motorcycle Seats?
For fitting inside the motorcycle seat, you have two options: gel or foam. The gel is the best choice for people who will ride for longer distances since it follows your body’s contour. Foam-based seats are better for short-term comfort. They can be bought for cheap and used for short-distance rides.
For the exterior covering, leathering and vinyl are two incredible contenders. Of these, leather is the better choice since it lasts longer and withstands sun and rain damage. However, it can be quite expensive and won’t come pre-installed on the bike.
Why Are Motorcycle Seats So Uncomfortable?

You may find that your motorcycle seat is uncomfortable. The exact reason for this is never easy to point out. Perhaps you weigh too much, and the seat is too soft for you. Or perhaps you weigh too little, and the seat just isn’t soft enough.
The reason is that there are just too many body shapes and weights for the manufacturer to accommodate. They may make seats meant for a certain type of individual, but not for all types.
This is why many people are resorting to making their motorcycle seats.
How Do I Soften My Motorcycle Seat?
There are several ways you can soften your motorcycle seat. The simplest method is to drill or cut out some holes in the foam seat. Keep in mind that the holes may affect the structural integrity of the seat. So start sparingly and keep making more holes if the seat isn’t comfortable enough. You want to drill the holes from the bottom of the seat and stop an inch before reaching the top.
Another method is to replace the seat with softer foam. You can do this by removing a section of the foam from where you sit and replacing it with softer foam or even memory foam.
You can also make your seat using the following guide on how to make a motorbike seat.
Be careful when playing around with memory foam, though, as many people report that it makes the ride uncomfortable. Memory foam is made for beds, where your weight is distributed. On a bike, however, one small section of the memory foam is bearing your whole weight. This will lead to sagging and steals support from your lower body.
How to Make A Motorbike Seat – Step by Step:
Step 1: Remove the Side Covers and Fenders
Before you learn how to make a motorbike seat, you’ll want to start by removing the back fender. You can find the bolts easily, but it will be hard to access and remove them. It’s not necessary to remove the fender. But it will make things easier later on.
Next, remove the side covers. There will be two bolts on either side of the side covers. Unbolt them, and you’ll finally have access to the seat underneath.
Step 2: Remove the Old Seat
Once you remove the back fender and the side covers, you can finally remove the seat. In some cases, the seat can simply be lifted with little to no resistance. If, however, the seat doesn’t come out, try this method:
Push down on the part of the seat that is the lowest. This is usually the part near the front. Then, grab the back of the seat and pull it out, making an arcing motion upward. Be sure to keep the front of the seat pushed down.
Step 3: Find the Right Spot
Next, you’ll want to find the sweet spot on the bike. Now, without the seat, this will be tough. You’ll be sitting on an empty metal chassis that will dig into your bones. However, instead of looking for seating comfort, find the spot that gives you the best vision and access to the handlebars.
Undoubtedly, this sweet spot would be where you normally sit on the bike. But since your new seat won’t be as thick as the previous one, you’ll need to readjust your seating position.
Step 4: Decide A Mounting Style
Once you’ve found that sweet spot, it’s time to decide how you’re going to mount the seat. It may seem rather trivial, but there are a few things to note here.
You probably won’t be able to use the stock mounting points. This is because it will be harder to mount your seat using them, especially since the new seat will be thinner.
Instead, you can use the many holes present right below where the seat used to be. You can choose up to 4 holes. Just make sure they are evenly spaced, and there are some holes for both the tail and the head of the seat. Choose holes that are easy to access since you’ll need to fasten bolts to them.
Step 5: Get Your Template Ready
Next, start designing a template. The template will take the shape and form of the chassis under the bike’s seat. But you can experiment with different shapes if you’re feeling up to it.
Next: If you’re troubleshooting step-by-step, these will help:
- How To Fix A Bent Aluminum Motorcycle Rim?
- How To Choose A Touring Motorcycle
- How To Maintain An Electric Motorcycle
Lay down your cardboard over the bike’s frame and mark your template. Since cardboard is flexible, you can “wrap” it around and mark off the edges. Also, mark where the mounting holes are.
Step 6: Mark and Cut the Pan
Trace your template onto the plywood sheet and mark off the holes as well. Next, get your saw (jigsaw, scroll saw, or any other type) and start cutting. It would be best to use a drill to drill out the mounting holes. The drill bit size will depend on the size of the hole.
It is at this point that you would want to bolt down the plywood base. Make sure it’s tight and doesn’t budge. Sit on it and give it a few tentative laps and see if it comes off.
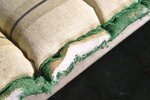
Step 7: Lay Down Your Padding
Now, you should lay down the padding. The padding can be your foam of choice. You can choose a few different types of foam and layer them on top of each other.
For multi-layer foam setups, consider making the bottom layer the densest. Then gradually add softer and more comfortable layers as you go up. Your last layer can be memory or gel-infused foam if you want that. It’s recommended to use at least two layers, as one layer won’t be suitable. Glue down the layers using any suitable foam glue.
Cut the padding according to the template, either using the template or the pan you just cut. For fastening the foam to the plywood, use a heavy-duty stapler, particularly one recommended for foam.
Also, cut out some padding at least two inches thick as long as the plywood and staple it to the plywood’s sides. This is so that you don’t feel any of that plywood poking out.
Step 8: Add Upholstery
Adjust the foam so it’s in the right position, and then tape down a strip of duct tape lengthwise and then widthwise. Make sure it’s nice and tight.
If you’re going for a permanent solution, you can use stickier tapes such as Gorilla Tape. But for temporary seats, consider regular duct tape. It’s quite strong and will get the job done.
Now, wrap the tape around the seat widthwise. Cover the whole foam, then do the same lengthwise. If you want, you can staple down a vinyl or leather cover at this point. But for most people who don’t know how to make a motorbike seat cover, it’s safer to use tape.
FAQ
What Kind of Foam Is Used for Motorcycle Seats?
Most bike seats are made from closed-cell or open-cell PU foam. Open-cell foam is softer and allows for better ventilation. And closed-cell foam is thicker, providing more support at the cost of comfort. Some seats may incorporate both, with the bottom layer being for support and the top layer for comfort.
Is Memory Foam Good for Motorcycle Seats?
No, it is not recommended. While it may feel comfortable for the first 5 minutes, it can sag pretty fast. Recall that memory foam is made for beds, not seats. Your weight is a lot more concentrated when you’re sitting vs. when you’re lying down.
Why Are Motorcycle Seats So Uncomfortable?
Everyone has a different seating style, preferred seat hardness, and weight. Manufactures cannot mitigate these factors for everyone. Instead, it’s better if you do the adjustment yourself.
Conclusion
Making your motorcycle seat isn’t the easiest, but it’s not the toughest either. While you can buy many off-the-shelf motorcycle seats and even OEM replacements, there’s nothing like a good old DIY.
Now that you know how to make a motorbike seat, it’s time to get started! Before you begin, be sure to bring your motorcycle into a workstation or garage.
Building your motorcycle seat shouldn’t cost you a lot. Many of the materials can be found as scrap lying around the house. You can acquire the foam from old sofas and upholstery. And plywood from old bed frames and cabinets can be repurposed as well. And if you’re looking for a cheap upholstery alternative, you can simply use duct tape!
Lastly, be unafraid. The process is a bit more forgiving than you think, so confidently build your motorcycle seat from scratch.
Quick answer
How To Make A Motorcycle Seat?: Here’s the short version: identify the likely cause(s), confirm with a simple check, then fix the easiest/highest-probability items first. If the issue affects braking, steering, tires, or fuel leaks, stop riding and inspect before the next ride.
Key questions (so you don’t waste time)
- Primary query: How To Make A Motorcycle Seat?
- What tools/parts do you need before you start?
- What are the common failure points and how do you avoid them?
- How do you verify the fix worked (test/inspection checklist)?
At-a-glance guide
| Best first check | Tires/brakes/obvious leaks/loose fasteners |
| Best second check | Drive system tension/condition + electrical/battery |
| Stop riding if | Brake issues, steering wobble, tire damage, fuel leaks |
Step-by-step (practical)
- Confirm the symptom: reproduce it safely and note when it happens (cold/hot, RPM, speed, bumps, braking).
- Do the quick checks first: tire pressure/condition, chain/belt tension (if applicable), obvious leaks, loose fasteners, battery terminals.
- Isolate one variable: change one thing at a time (e.g., fuel, load, settings) and retest.
- Fix in a safe order: address safety-critical items first (brakes/tires/steering), then reliability items (charging/fueling), then comfort/noise.
- Verify: short test ride + post-ride inspection.
Checklist
- Tires: pressure, tread, age/cracks, punctures
- Brakes: lever feel, pad thickness, rotor condition, fluid level/leaks
- Drive: chain slack + lubrication (or belt condition)
- Controls: throttle free play, clutch free play, cable routing
- Electrical: battery voltage, terminals tight, main grounds
- Fluids: oil level, coolant (if liquid-cooled), fuel smell/leaks
Common mistakes
- Chasing “rare” causes first instead of checking the basics.
- Changing multiple things at once (you lose the diagnosis signal).
- Ignoring safety-critical symptoms (wobble, brake fade, fuel leaks).
- Over-tightening fasteners without a torque spec.
FAQ
Can I keep riding if this happens occasionally?
If it affects brakes, steering stability, tire integrity, or you smell fuel, don’t ride until inspected. For minor noise/vibration, do the checklist and monitor for change.
What’s the fastest way to narrow it down?
Reproduce the symptom, note the conditions, then do the “basics” checklist. Fix/confirm one item at a time.
What tools do I need?
At minimum: tire gauge, basic metric sockets/hex keys, flashlight, and a way to measure battery voltage. A service manual helps with torque values.
When should I go to a shop?
If you’re not confident with brakes/tires/steering, if a fix requires specialty tools, or if the symptom persists after basics.
How do I verify the fix?
Short ride close to home, then re-check: leaks, fasteners, tire pressure, brake feel, and that the symptom is gone.
Next steps (related guides)
Content refresh note: this post was updated to add an answer-first summary, a structured checklist, common mistakes, FAQ, and internal links for next steps.