
What would you do when you have to fix a motorbike puncture in the middle of your journey? Do you go to a repair shop and get a patch, or you do it yourself? And most importantly, is it safe to do so?
There are three approaches to fix a motorcycle puncture: patching, plugging, and replacing. Plugging and patching, while significant temporary fixes are not recommended as long-term solutions. Replacing the motorcycle tire will be a better option for your safety and convenience.
But even as a temporary solution, how do you work around a punctured bike? Is the process same for both tubed and tubeless tires? And what tools will you need?
To answer all these, we have compiled a guide on how to fix a puncture on a motorbike. We will look at the most common methods for fixing bike punctures and related questions.
So, let’s get started!
Tubeless Vs. Tubed Tires

Before you learn how to fix a puncture on a motorbike, you must first decide if you have a tubed or a tubeless tire.
But why is it important to know whether you have a tubed or a tubeless tire? The process for fixing a flat on a tube tire vs. a tubeless tire is different. So, it’s essential to understand how to fix each of them.
You can begin by deflating the tire so much so that you can pry your fingers in between the bead and the rim.
Use your fingers to pull the bead away and take a closer look. If you can see a tube inside, you indeed have a tubed tire. If instead of a tube there’s nothing or you see sealant residue, it’s tubeless.
How to Fix a Tubed Tire
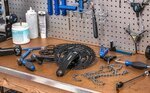
What you’ll need:
- Tire levers.
- Air pump.
- Chalk or marking instrument.
- Sandpaper.
- Tire glue.
- Tire rubber patch.
- Chalk grater (optional).
Some of these items are available in puncture repair kits.
Step 1: Identify the Puncture
First things first: identify the puncture to remove the inner tube by using the tire levers. But if your tire doesn’t feature a very prominent tread, you can do it without removing the tube.
There are two ways to identify the puncture. You fill the tube with air using a pump and turn the tire near your ear in the first one. Keep turning it until you hear the wind coming out of the hole.
In the second method, you run it under water and check where the air bubbles are coming from. Mark the hole using chalk, a marker, or anything that doesn’t get washed out.
Step 2: Prepare the Surface
Start by deflating the tire by pressing in the tire valve. Then sand the marked hole until the area is rough enough. Don’t sand too much, or it might create a bigger hole.
Step 3: Apply the Glue
Next, apply the glue from your tire repair kit. The exact application specifications will vary, so be sure to read the instructions. After applying, let the glue dry for about 5 minutes.
Step 4: Stick the Patch On
Finally, you need to stick the patch. Remove the foil backing and paste it to where you applied your glue. The centre of the patch should cover the hole. Press on it firmly and squeeze out any air bubbles.
Leave it for a couple of minutes, and remove the plastic cover.
Step 5 (optional): Grate the Chalk
Some repair kits that come with chalks often come with graters. Use these to grate the chalk over the patch and the area surrounding it. This will absorb the residual glue.
How to Fix a Tubeless Tire
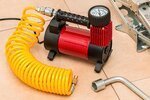
What you’ll need:
- Air pump for tubeless tires.
- Chalk or marking instrument.
- Damp cloth.
- Superglue.
- Special cement.
- Tire patch.
- Sandpaper (in some cases).
- New sealant.
Some of these items are available in tire puncture kits.
Step 1: Identify the Cut
Before you learn how to fix a puncture on a motorbike, you must identify the cut. You must do this prior to unseat the tire from the bead, as you won’t identify the cut after that.
Pump the tire with air and listen to any wind escaping. You can also run it under a sink and check for any air bubbles. Mark the cut using chalk or any other water-resistant material.
Step 2: Pop the Tire Bead Off
Next, you’ll need to remove the tire bead. Start by inserting the tire levers between the bead and the rim and prying it off. You may only need to pop off the bead from one side, and the rest might come off on its own.
Step 3: Clean Out the Old Sealant
Before you begin with the repair, it’s a good idea to clean the old sealant. If the sealant is still liquid and, in its lifespan, (usually a couple of months), you can suck it up using a syringe and reuse it. To clean congealed sealant, use a damp cloth. You’ll also want to clean the cut using the same method.
Step 4: Glue the Cut
If the cut is substantial, you’ll need to use superglue on it. Read the instructions on the glue and apply it as directed.
Step 5: Apply the Special Cement
Next, apply the special cement. This is similar to the tire glue that you use to fix tubed tires. The cement will allow the patch to stick onto the surface. Again, follow the instructions mentioned on the packet, including preparation.
Step 6: Stick the Patch On
Now stick the patch. Remove the foil backing and stick it carefully to the cement you applied. Press down hard to stick and squeeze any air bubbles. Take off the plastic cover and let it cure overnight.
Step 7: Reseat the Tire
As a final step on how to fix a puncture on a motorbike, you’ll want to reseat the tire. Insert the bead from one side and seat the other side accordingly. Leave some portion unseated to inject the sealant. Once the sealant is injected, turn the tire around to let it flow to the rest of the tire and seat the final section.
Common Problems with Fixing Punctures
Puncture Is Too Big:
One of the most common problems with fixing punctures is if the puncture is too big. If that’s the case, discard the tire and buy a new one.
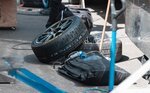
Puncture Is on Sidewall:
Another common problem is a sidewall puncture. These punctures are hard to fix since the sidewalls have less integrity than the tread.
There are two ways to fix a puncture: either you use a plug or a patch. Since the sidewall flexes a lot when the tire is moving, neither of those will hold. Your best option is to buy a new tire.
Long-Term Puncture Solution:
Plugging or patching a motorcycle tire isn’t the best way to go about things. A long-term solution to a puncture is to get a new tire.
FAQ
How do you fix a hole in a motorcycle tire?
There are two techniques on how to fix a puncture on a motorbike: a patch or a plug. A patch is applied on the tire’s surface, whereas a plug goes deeper.
Is it illegal to patch a motorcycle tire?
It’s not illegal, but it is highly discouraged, and most shops won’t take on such liability.
How long can you ride on a plugged tire?
How long a plugged tire lasts is always a guess. And instead of taking your chances, it’s better to replace your tire. A plugged tire should last enough to take you home at least.
Is it safe to ride a motorcycle with a plugged tire?
It is not considered safe. The plug can fail very easily. Now, this isn’t to say you’ll be in immediate danger. But if you’re going fast around a curve, a flat tire may be fatal.
How much does it cost to patch a motorcycle tire?
A tire patch can cost you $20 if done from a shop, but most will discourage it. A tire puncture kit will cost about the same.
Can you put a tube in a tubeless motorcycle tire?
Yes, but the rim needs to be an MT-type, and the inside of the rim shouldn’t be ribbed. This will also lower down the speed of the tire.
Can a plugged tire blow out?
Plugged tires will eventually go flat. That is to say; they will start leaking out air. But they won’t “blow” in the literal meaning of the word. A flat tire is still dangerous, though.
Conclusion
Punctured motorbike tires are twice as dangerous as those on cars. Unlike a car with numerous safety features and three other tires for support, your bike isn’t entirely safe.
Luckily, some temporary fixes will let you get home for a replacement. The puncture repair process is different in tubed and tubeless tires. And you should always have a repair kit along with a bike pump at hand.
However, it is crucial to your health and bike to use these methods as temporary fixes. Both tire plugs and patches tend to fail. For a permanent solution, always replace the bike tire. It’s better than taking your chances with a plug or a patch that could open at any time.
Now that you know how to fix a motorbike puncture, you can ride more confidently.
Quick answer
How To Fix A Puncture On A Motorbike On The Go: Here’s the short version: identify the likely cause(s), confirm with a simple check, then fix the easiest/highest-probability items first. If the issue affects braking, steering, tires, or fuel leaks, stop riding and inspect before the next ride.
Key questions (so you don’t waste time)
- Primary query: How To Fix A Puncture On A Motorbike On The Go
- What tools/parts do you need before you start?
- What are the common failure points and how do you avoid them?
- How do you verify the fix worked (test/inspection checklist)?
At-a-glance guide
| Best first check | Tires/brakes/obvious leaks/loose fasteners |
| Best second check | Drive system tension/condition + electrical/battery |
| Stop riding if | Brake issues, steering wobble, tire damage, fuel leaks |
Step-by-step (practical)
- Confirm the symptom: reproduce it safely and note when it happens (cold/hot, RPM, speed, bumps, braking).
- Do the quick checks first: tire pressure/condition, chain/belt tension (if applicable), obvious leaks, loose fasteners, battery terminals.
- Isolate one variable: change one thing at a time (e.g., fuel, load, settings) and retest.
- Fix in a safe order: address safety-critical items first (brakes/tires/steering), then reliability items (charging/fueling), then comfort/noise.
- Verify: short test ride + post-ride inspection.
Checklist
- Tires: pressure, tread, age/cracks, punctures
- Brakes: lever feel, pad thickness, rotor condition, fluid level/leaks
- Drive: chain slack + lubrication (or belt condition)
- Controls: throttle free play, clutch free play, cable routing
- Electrical: battery voltage, terminals tight, main grounds
- Fluids: oil level, coolant (if liquid-cooled), fuel smell/leaks
Common mistakes
- Chasing “rare” causes first instead of checking the basics.
- Changing multiple things at once (you lose the diagnosis signal).
- Ignoring safety-critical symptoms (wobble, brake fade, fuel leaks).
- Over-tightening fasteners without a torque spec.
FAQ
Can I keep riding if this happens occasionally?
If it affects brakes, steering stability, tire integrity, or you smell fuel, don’t ride until inspected. For minor noise/vibration, do the checklist and monitor for change.
What’s the fastest way to narrow it down?
Reproduce the symptom, note the conditions, then do the “basics” checklist. Fix/confirm one item at a time.
What tools do I need?
At minimum: tire gauge, basic metric sockets/hex keys, flashlight, and a way to measure battery voltage. A service manual helps with torque values.
When should I go to a shop?
If you’re not confident with brakes/tires/steering, if a fix requires specialty tools, or if the symptom persists after basics.
How do I verify the fix?
Short ride close to home, then re-check: leaks, fasteners, tire pressure, brake feel, and that the symptom is gone.
Next steps (related guides)
Content refresh note: this post was updated to add an answer-first summary, a structured checklist, common mistakes, FAQ, and internal links for next steps.
Quick answer
How To Fix A Puncture On A Motorbike On The Go: Start with the simplest, highest-likelihood checks first, then work outward. If anything affects brakes, steering, tires, or fuel leaks, stop and inspect before riding.
Primary checklist (do this in order)
- Confirm the symptom and reproduce it safely (short ride / stand test).
- Do the fast visual inspection (tires, chain/belt, controls, leaks).
- Measure/adjust the basics (pressures, slack, torque marks, free-play).
- Test again and document what changed.
Supporting questions (and the practical answers)
What tools/parts do you need before you start?
Answer it with a quick check first. If the quick check points to a component, inspect/adjust/replace in that order. Only move to deeper diagnostics after you’ve ruled out setup and wear items.
What are the common failure points and how do you avoid them?
Answer it with a quick check first. If the quick check points to a component, inspect/adjust/replace in that order. Only move to deeper diagnostics after you’ve ruled out setup and wear items.
How do you verify the fix worked (test/inspection checklist)?
Answer it with a quick check first. If the quick check points to a component, inspect/adjust/replace in that order. Only move to deeper diagnostics after you’ve ruled out setup and wear items.
Common mistakes
- Changing multiple variables at once (you can’t tell what fixed it).
- Ignoring tire pressure/condition (it causes a surprising number of “mystery” symptoms).
- Over-tightening fasteners instead of using specs/torque values.
- Skipping a post-fix test ride checklist (brakes, steering, lights).
FAQ
What’s the quickest way to how to fix a puncture on a motorbike on the go?
Use the checklist above first. If the symptom affects safety-critical systems (brakes/steering/tires), don’t ride until it’s verified fixed.
What should you avoid when dealing with how to fix a puncture on a motorbike on the go?
Use the checklist above first. If the symptom affects safety-critical systems (brakes/steering/tires), don’t ride until it’s verified fixed.
When should you stop and get a professional inspection?
Use the checklist above first. If the symptom affects safety-critical systems (brakes/steering/tires), don’t ride until it’s verified fixed.